

Present like a pro with Fusuma and MD
There is a lot of software out there to deal with presentations creating slides, I recently found Fusuma and I find the results very impressive compared to the time I had to invest in it.
You can follow the tutorial directly in the slides generated with Fusuma on this direction and check the source code.
The main benefits of using Fusuma are:
- Create slides as simply as adding a new md or mdx file.
- Responsive design.
- Automatically generate the content section.
- You don't need to configure it, but it has settings to suit your needs.
- Markdown and MDX are supported.
- Several themes included.
- Code syntax highlighting for your code blocks, diagrams and flowcharts.
- Presentation mode, you will have the slides on one screen and the presentation control panel in the other.
- Elapsed time counter.
- Preview of the next slide.
- Preview of the previous slide.
- Presentation notes.
- Current / remaining slides.
- Record audio and actions.
- Custom CSS in the global CSS settings.
- Easy to deploy to GitHub Pages and any other host like Netlify or Vercel.
- Exporting slides as PDF.
Instalation
Make a new empty project with:
npm init -y
Add the following commands under the scripts section:
  "scripts": {
    "init": "fusuma init",
    "start": "fusuma start",
    "start-prod": "npm run build && fusuma start-prod",
    "build": "fusuma build",
    "deploy": "npm run build && fusuma deploy",
    "export-pdf": "npm run build && fusuma pdf"
  }
Install the fusuma dev dependency with npm install -D fusuma.
And finally execute npm run init. You will get a basic Fusuma project with:
├── .fusumarc.yml
├── .github
│   └── workflows
│       └── fusuma.yml
├── package.json
├── slides
│   └── 0-slide.md
└── style.css
You can test it with npm run start and check the first slide 0-slide.md.
Creating new slides
It's as easy as creating a new markdown file in the slides folder. The order of the slides will be numerical and then alphabetical.
Modifying the first slide
Inside the 0-slide.md you can see the following content:
<!-- classes: title -->

# Hello😃

<!-- block-start: grid -->
<!-- account: twitter, your-account-name -->
<!-- block-end -->

---

<!-- section-title: Bye👋 -->

## Bye👋

Let's look at some of the syntax on that slide:
- classes allows you to include CSS classes that you will declare in the
style.cssfile. - block-start / block-end allows you to include CSS classes to that block.
- account generates a class name (in that example
account-twitter) an icon and the link for that social network. - --- you can divide slides with that, the content after that will become a new slide.
- section-title declares a title for your file, it will be placed in the sidebar and in the table of contents.
There are also other tags available to you.
Tags
Fragments
With fragments you can show the different sections of you slide one by one.
<!-- fragments-start -->

You're thinking in number...

<!-- fragments-end -->

<!-- fragments-start -->

3️⃣2️⃣

<!-- fragments-end -->
Background
You can set images and colors for the background of that specific slide.
<!-- background: '../assets/background.jpeg' -->
<!-- background: #f5f5f5 -->
<!-- background: green -->
Speaker Notes
If you don't like improvisation, speaker notes come to the rescue. We'll look at the speaker's screen in detail later, but these notes will appear in a section that only you will see.
<!-- note
Remember to not say your PIN card
-->
Accounts for Social Networks
You can use the following icons and links for social networks:
<!-- account: twitter, your account name -->
<!-- account: github, your account name -->
<!-- account: facebook, your account name -->
<!-- account: linkedin, your account name -->

QR Code
You can create a QR.
<!-- qr: https://github.com/hiroppy/fusuma -->
Creating a contents slide
Let's create the first slide we might need, the content. Make a new markdown file called 1-contents.md, the names are totally up to you by the way.
## Contents

<!-- contents -->
Inside the file, we place a title and a special tag that will automatically retrieve the titles of all the slides to create a nice and clean table of contents.
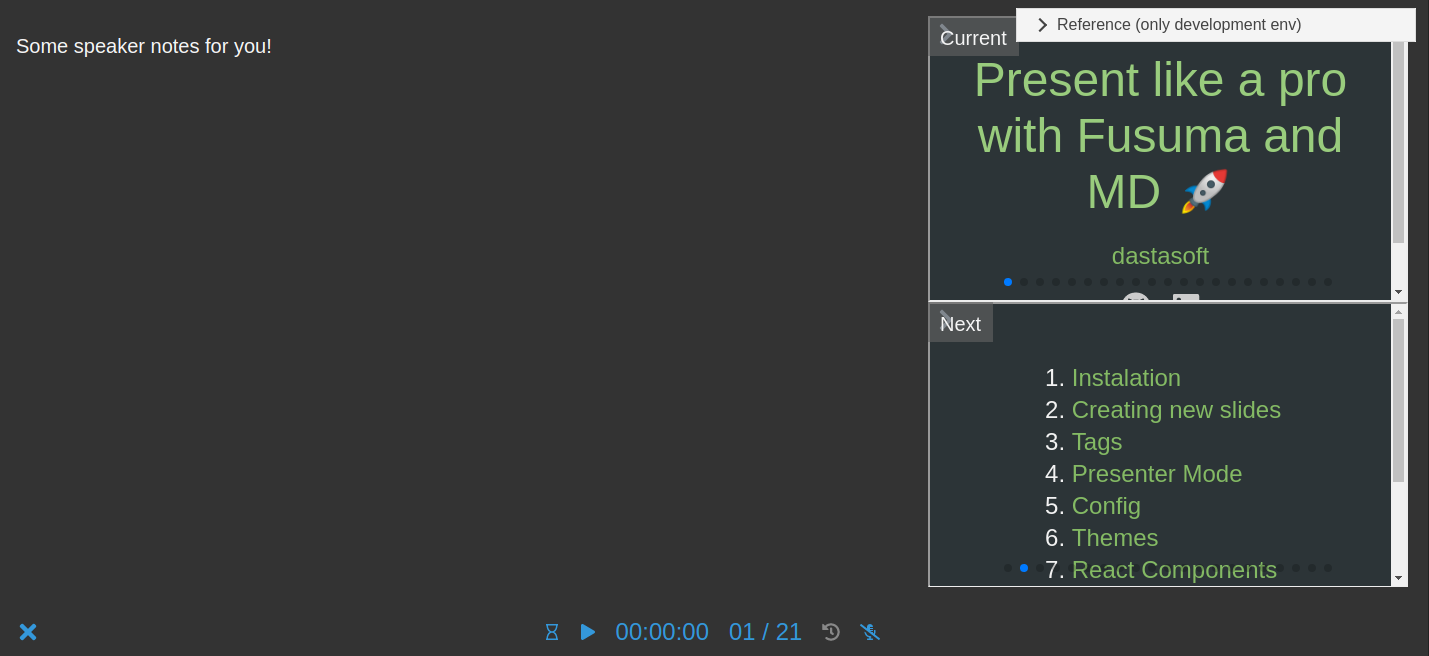
Presenter Mode
Fusuma has a Presenter Mode that allows you to put the slides on one screen while viewing the speaker's screen on the other. The speaker screen will contain:
- The speaker notes that you placed on each slide.
- A preview of the last slide and the next slide.
- A timer.
- How many slides are left.
All the tools you would need if you were making a speech.
To activate presenter mode, go to the side menu and click on the screen icon. If the browser has permision to broadcast, a pop-up will appear asking on which screen/device you want to broadcast the slides.
Config
The configuration is not necessary but many aspects of the presentation can be customised by modifying the .fusumarc.yml file.
meta:
  url:
  title:
  description:
  thumbnail:
  siteName:
  sns:
    - twitter
slide:
  loop: false
  ui:
    sidebar: true
    vertical: false
    pagination:
    effect:
  code:
    languages:
      - javascript
      - html
    plugins: []
    theme: default
- meta section is for SEO purposes, if you want to share your presentation across the web these fields will help you to customize the link preview. The
thumbnailis automatically generated if nothing is specified and theurlfield is filled in. - slide settings relative to each slide.
- loop if true, the last slide will continue with the first.
- sidebar toggles on/off the side menu with options and contents.
- pagination you can choose between
bullets,progressbarandfractiontho show how many slides there are. - effect you can choose between
fade,cubeandflipfor animation when changing slides.
- code uses Prims.js and babel-plugin-prismjs to highlight code syntax.
- languages you specify here the languages you want to apply syntax highlighting, by default only javascript is enabled.
For code syntax highlight I have to downgrade my project to version 2.6.0 toget it to work properly.
Changes to these parameters requires a restart of the application.
Themes
You can modify the whole look and feel with CSS, but by default Fusuma comes with five different themes.
Open the style.css file and import the css for the theme you want, the possibilities are:
@import '@fusuma/client/assets/style/themes/babel.css';
@import '@fusuma/client/assets/style/themes/default.css';
@import '@fusuma/client/assets/style/themes/node.css';
@import '@fusuma/client/assets/style/themes/pop.css';
@import '@fusuma/client/assets/style/themes/webpack.css';
Test the different themes and if you need some fine tuning add the classes you need in the style.css to modify the theme or create a new one.
If you want to create a new one, change the colors of the following css variables:
:root {
  --color-title: #e53498;
  --color-base: #1c1235;
  --color-background: #e5e5e5;
  --color-link: #6f4dca;
}
React Components
You can import your React Components into the .mdx files and use them as in a normal React project.
Let's create a src folder in the root of your project folder, inside we'll create a folder called components and a file called Counter.js
Inside Counter.js we paste the following example code:
import React, { useState } from 'react'

const Counter = () => {
  const [count, setCount] = useState(0)

  return (
    <div className="react-component">
      <p>You clicked {count} times</p>
      <button onClick={() => setCount(count + 1)}>Click me!</button>
      <button onClick={() => setCount(0)}>Reset</button>
    </div>
  )
}

export default Counter
And inside of your .mdx file:
import Counter from '../src/components/Counter';

<Counter />
You now have a React Component working directly on the slide, very handy in combination with code blocks to show the source code and the execution of the component.
Distribute
Apart from running the project on your localhost, which can be valid in some cases with npm run start-prod script. You can distribute your slides in two ways.
Make a PDF
If you want to share your slides without hosting you can export them as a PDF. (Be careful with your React Components because they will stop working).
To make the export to PDF first install the dependency:
npm install -D @fusuma/task-pdf
Once installed, run the npm run export-pdf script.
In the root of your project you will get a slide.pdf file with your slides.
Deploy
You can build the project as a regular React project with npm run build and this will create the static files like in any other React project, with that you can deploy to any service like Vercel or Netlify, you only need to configure those services to run the build script every time you perform a git push.
This option is very handy if you want to share your slides directly from the browser.
Lighthouse
If you care about performance, accessibility, best practices and SEO, Fusuma has you covered, you'll get impressive results from Google Lighthouse even from the default settings.
But there are some nuances:
- The SEO part of the configuration must be filled out to get to 100 in the SEO section.
- Some themes (and your CSS modifications) can lower the score in the Accessibility section.
Resources
And above all, take a look and give love to the creator hiroppy for this awesome and convenient tool!